This free resource was originally developed in early 2020 to support people who found themselves unexpectedly moving their work into virtual environments during the COVID-19 pandemic. It was updated in 2026 to reflect current smartphone technology and recording practices.
…
VIDEO DOCUMENTATION WITH SMARTPHONES
Part I: Best Practices for Shooting Video with a Smartphone
_________________________________________________________________________________________________________________
A quick note on vertical versus horizontal video
With the rise of mobile-first content, vertical video has become a widely used and entirely valid format. It may be the most appropriate choice when the footage is intended primarily for viewing on a phone or for sharing through vertical-format social media platforms.
Like any creative or technical choice, however, vertical video comes with trade-offs. For documenting in-class instruction, I generally recommend filming horizontally because it offers the greatest flexibility for future use. Horizontal footage is better suited to websites, presentations, projectors, desktop viewing, longer-form video, and archival or professional documentation. It also allows you to capture more of the classroom environment, including the instructor, students, materials, and surrounding activity within the same frame.
When the eventual use of the footage is not yet known, horizontal orientation is usually the most versatile and broadly compatible choice.
Unless your video will almost always be viewed on a vertical-format platform…
Do not shoot in vertical orientation (portrait)

❌Vertically shot video displayed with a 90° rotation
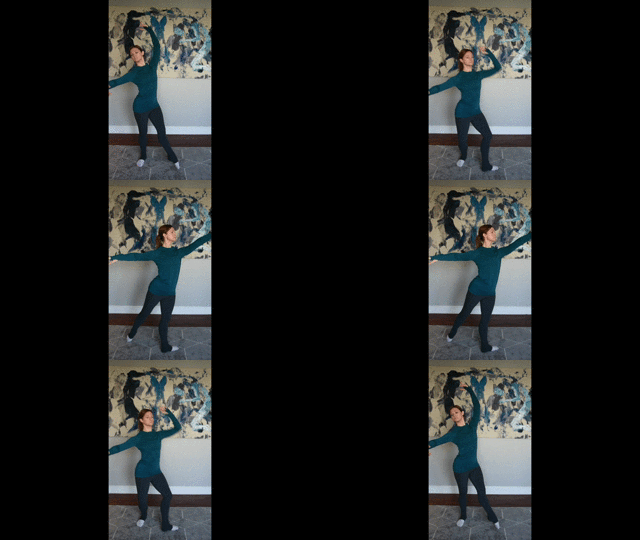
❌Size is reduced and wings are added to fill space

❌Important movement is lost out of frame
Video shot in a vertical orientation may not play back optimally for all viewers or in all applications. Some older video players may display the footage incorrectly, rotating it 90 degrees to the left or right. Newer video applications generally recognize vertically filmed footage but may scale it down and add black “wings” on either side to fill a horizontal display.
Vertical orientation also limits the amount of lateral movement that can be captured within the frame. Subjects moving from side to side may quickly fall partially or entirely out of view. To compensate, the person filming must move the camera farther/faster and more frequently to follow the subject, which can result in shaky footage that is difficult to watch.
Consider the shape of our natural field of vision: we perceive considerably more of the world horizontally than vertically. Filming with a smartphone in the horizontal, or landscape, orientation therefore provides a visual experience that more closely resembles the way we naturally view our surroundings. This can help viewers focus on and engage with the content of the video rather than being distracted by the limitations of the frame.

Human Visual Field: For those of us who have use of both eyes, our combined visual field extends substantially farther from side to side than from top to bottom, roughly one-and-a-half times as wide as it is tall. Early film and television commonly used the nearly square 4:3 frame but wider formats became increasingly established as film, television, and display technologies evolved. Today, horizontal video offers the greatest compatibility with presentations, computers, televisions, projectors, and most professional documentation contexts.
Filming yourself: use a tripod whenever possible or create the most secure stand you can
When filming yourself use a tripod if you can, create a secure stand if you have to

✔️Smartphone tripods are available in many configurations and can make self-filming easier and more stable.

✔️A firm cushion or folded towel can support the phone and help reduce vibration.
Smartphone tripods, clips, and mounts come in many configurations and can make self-filming much easier. If you have one, use it.
Some smartphone car mounts can be adapted for use with a tripod or another stable support. Only use an improvised setup if every connection is secure and the phone cannot easily slip, rotate, or detach.
If you do not have a tripod or mount, place the phone on a stable, elevated surface. A sturdy desk, table, or countertop is generally safer than a chair or another surface that may wobble, shift, or be bumped.
If your phone has a built-in stand or a phone grip that can support it horizontally, use that to help keep it upright.
You can also use books to create a support or wedge. Add a folded towel, nonslip material, or firm cushion around the phone to prevent sliding and reduce vibration. Make sure the material does not cover the camera lens or microphone.
Test any improvised setup close to the floor and over a soft surface before placing it at full height. Gently tap or bump the supporting surface to confirm that the phone will remain steady. Avoid testing over concrete, hardwood, or other surfaces that could damage the device if it falls.
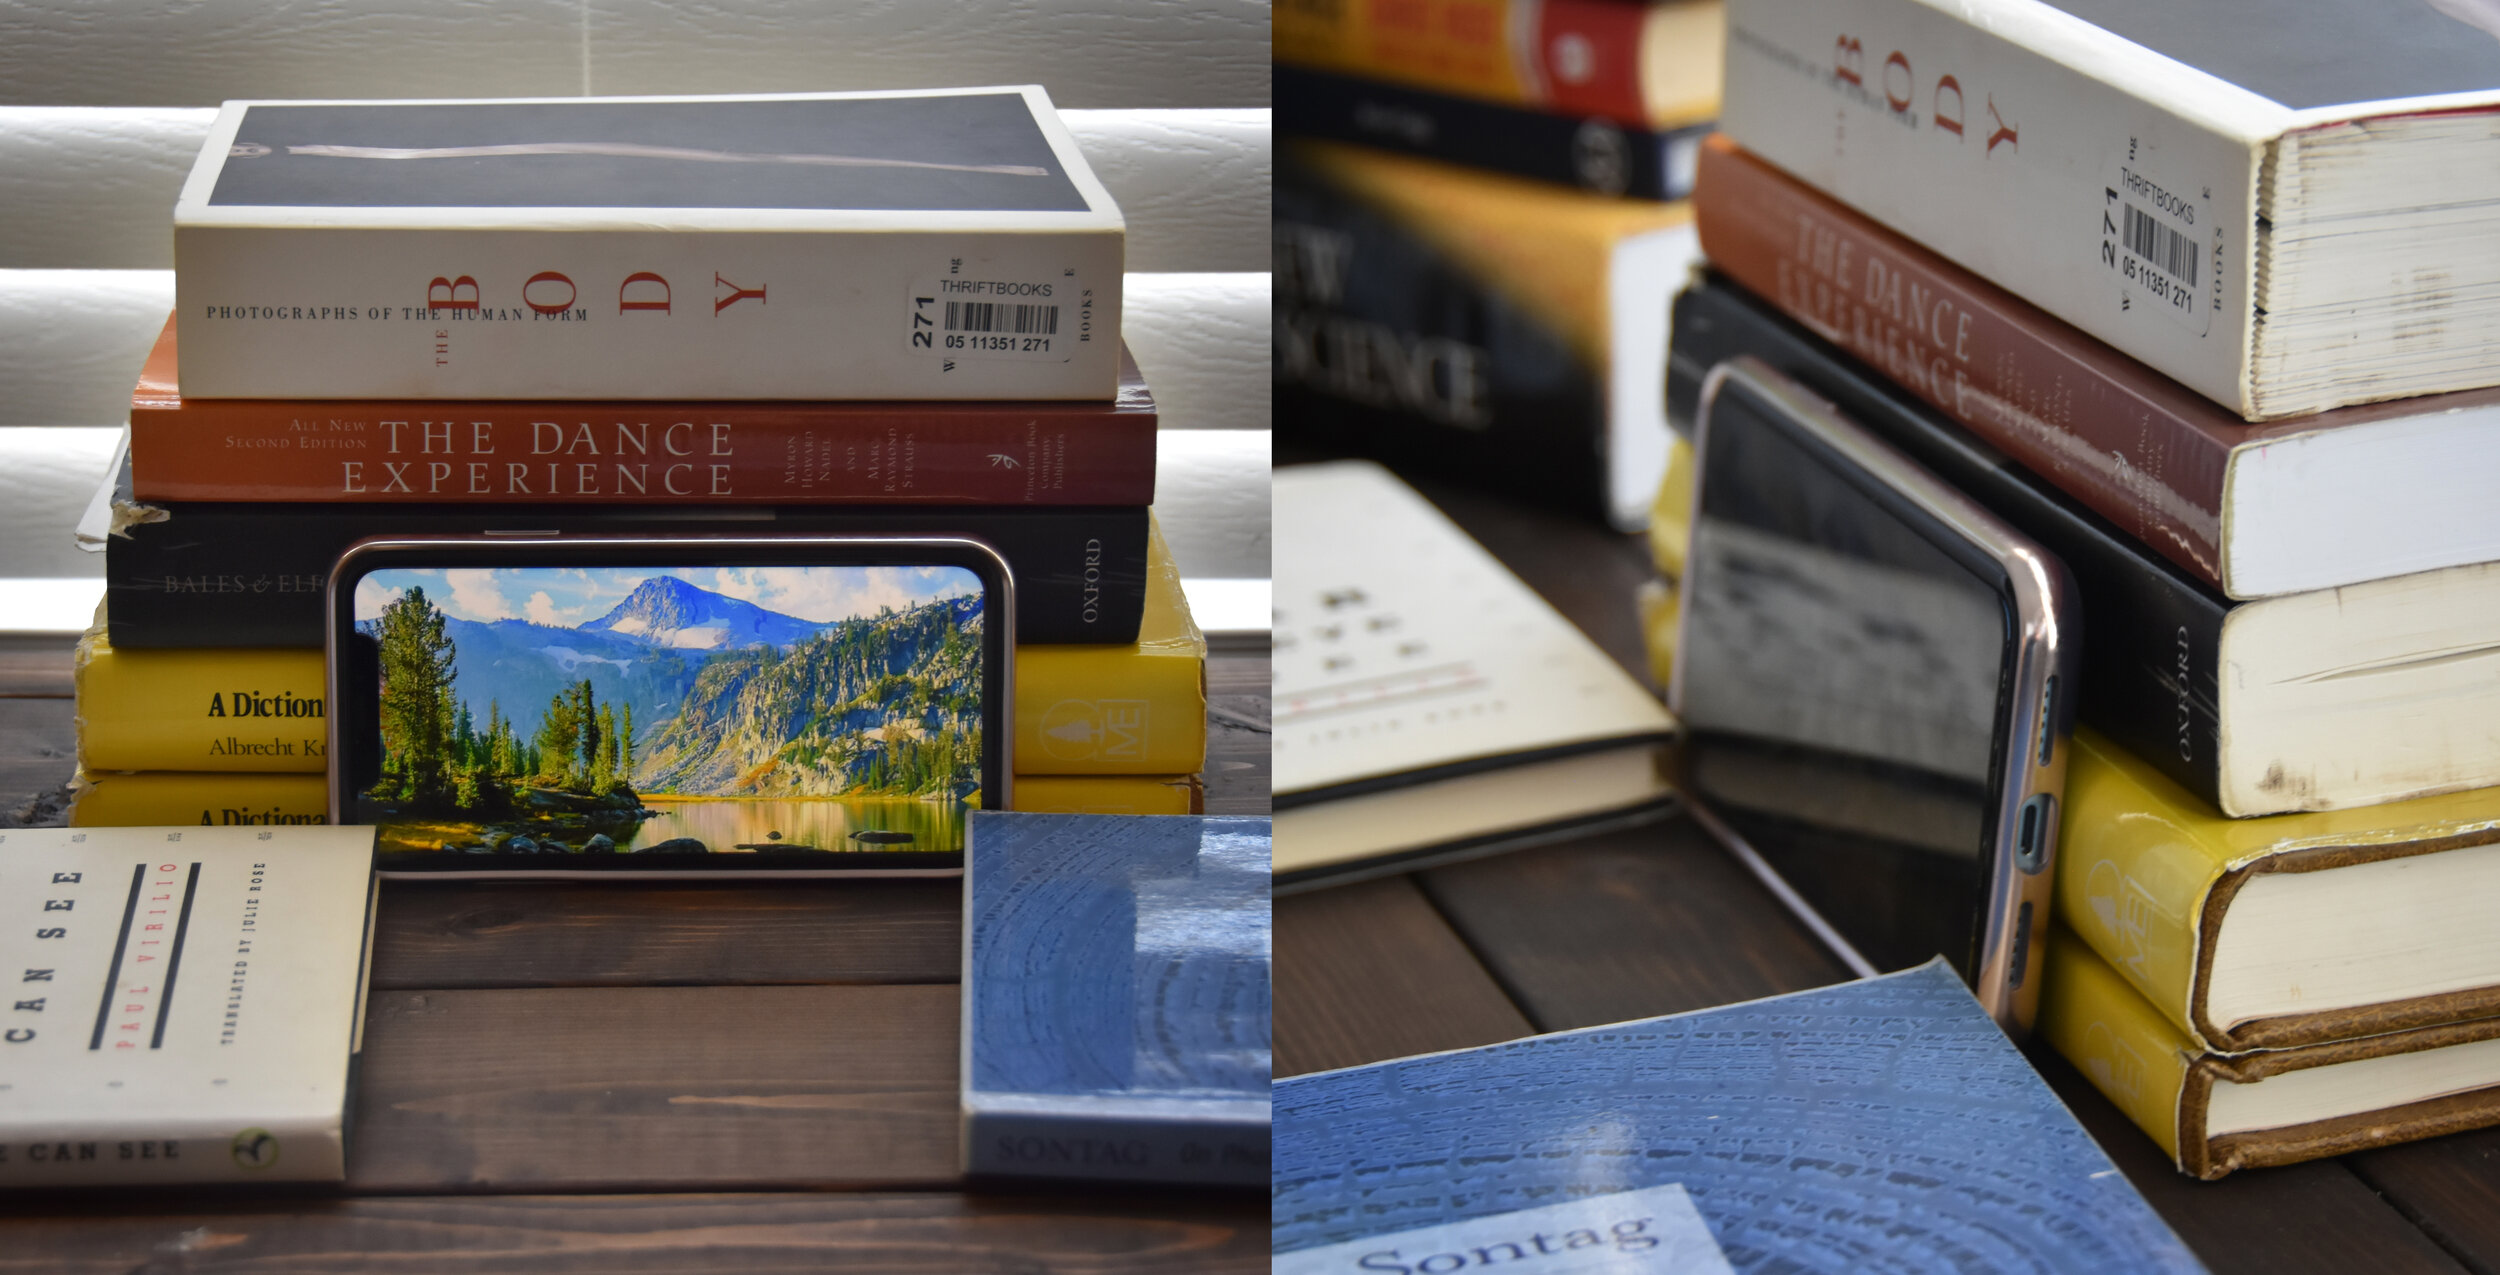
✔️Books provide a stable support that can be quickly adjusted for height and angle.
Filming others: choose stability or flexibility based on the activity
A tripod and a handheld camera each offer different advantages. Before recording, consider whether the activity will remain within a predictable area or move throughout the room. Choose the method that will capture the most important action clearly without disrupting the activity being filmed.
Using a tripod
A tripod provides a stable, consistent image and is usually the best choice when:
A speaker, instructor or activity will remain within a defined area.
You need to show the participant’s full body or the overall room arrangement.
You are recording a long demonstration or uninterrupted activity.
No one will be available to operate the camera continuously.
A fixed camera cannot follow unexpected movement, so frame somewhat wider than you think you need. Make sure participants can move without their heads, hands, or feet leaving the frame. Record a short test and ask someone to move through the complete activity area before beginning.
Holding the camera by hand
Handheld filming provides greater flexibility and may be useful when:
The activity moves through several areas.
You need to follow a particular participant or demonstration.
Important details cannot be seen clearly from one fixed position.
The structure of the activity is unpredictable.
Handheld footage is more likely to show camera shake, abrupt reframing, tilted horizons, or unnecessary movement. Use both hands, keep your elbows close to your body, and hold the phone near your chest rather than at the end of extended arms. Stand with your feet apart and turn your whole body slowly instead of moving the phone independently with your wrists.
Frame slightly wider when following movement. This gives the subject room to change direction without immediately leaving the image. Avoid frequent zooming, rapid panning, or constantly correcting the frame. Not every small movement needs to be followed.
Move safely while filming
If you need to change position, lower the phone briefly and look where you are going. Do not walk backward while watching only the screen. Be alert to participants, furniture, cords, stairs, uneven flooring, and other obstacles. Whenever possible, move to a new position while the activity is paused rather than walking around continuously during instruction.
A useful combined approach
For many activities, the most effective approach is to use a tripod for the primary, uninterrupted recording and capture a few short handheld clips separately for closer details.
When only one recording is possible, prioritize a stable, adequately wide view that preserves the complete action. A clear wide shot is generally more useful than a close camera that repeatedly loses the subject.
Avoid excessive zoom—position the camera closer when possible
Excessive digital zoom crops and enlarges the image, reducing visible detail and making softness and noise more noticeable.

❌ Digitally zooming in with your smartphone lowers the total resolution of your clip
Many smartphones now include more than one camera lens, allowing them to switch between wide, standard, and telephoto views. However, not every zoom setting represents true optical magnification. Between and beyond the phone’s native lens settings, the camera may crop and digitally process the image. This can reduce detail and make image noise, softness, and camera movement more noticeable. Even current manufacturers distinguish between optical, “optical-quality,” and digital zoom.
Whenever possible, position the camera close enough to frame your subject clearly while still leaving adequate room for movement. A closer camera can capture more visible detail and generally record clearer speech than one placed far away. Avoid moving so close that the subject appears distorted or frequently moves out of frame.
When some zoom is necessary, use the smallest amount possible. Begin with one of the phone’s marked camera settings—such as 1×, 2×, 3×, or 5×—rather than pinching far into the image. Keep the phone steady and provide plenty of even light. Good lighting can reduce visible noise and improve detail, but it cannot restore information lost through heavy digital cropping.
Whenever possible, set the framing before recording and avoid zooming during active recording. Changing zoom while filming can create distracting jumps in framing, exposure, color, or image quality when the phone switches between focal lengths (and in phone that have multiple lenses, switching between different cameras).
Lighting for clear video documentation
Lighting

✔️Window Light: Subject faces the window, with the camera positioned near the window and facing into the room.
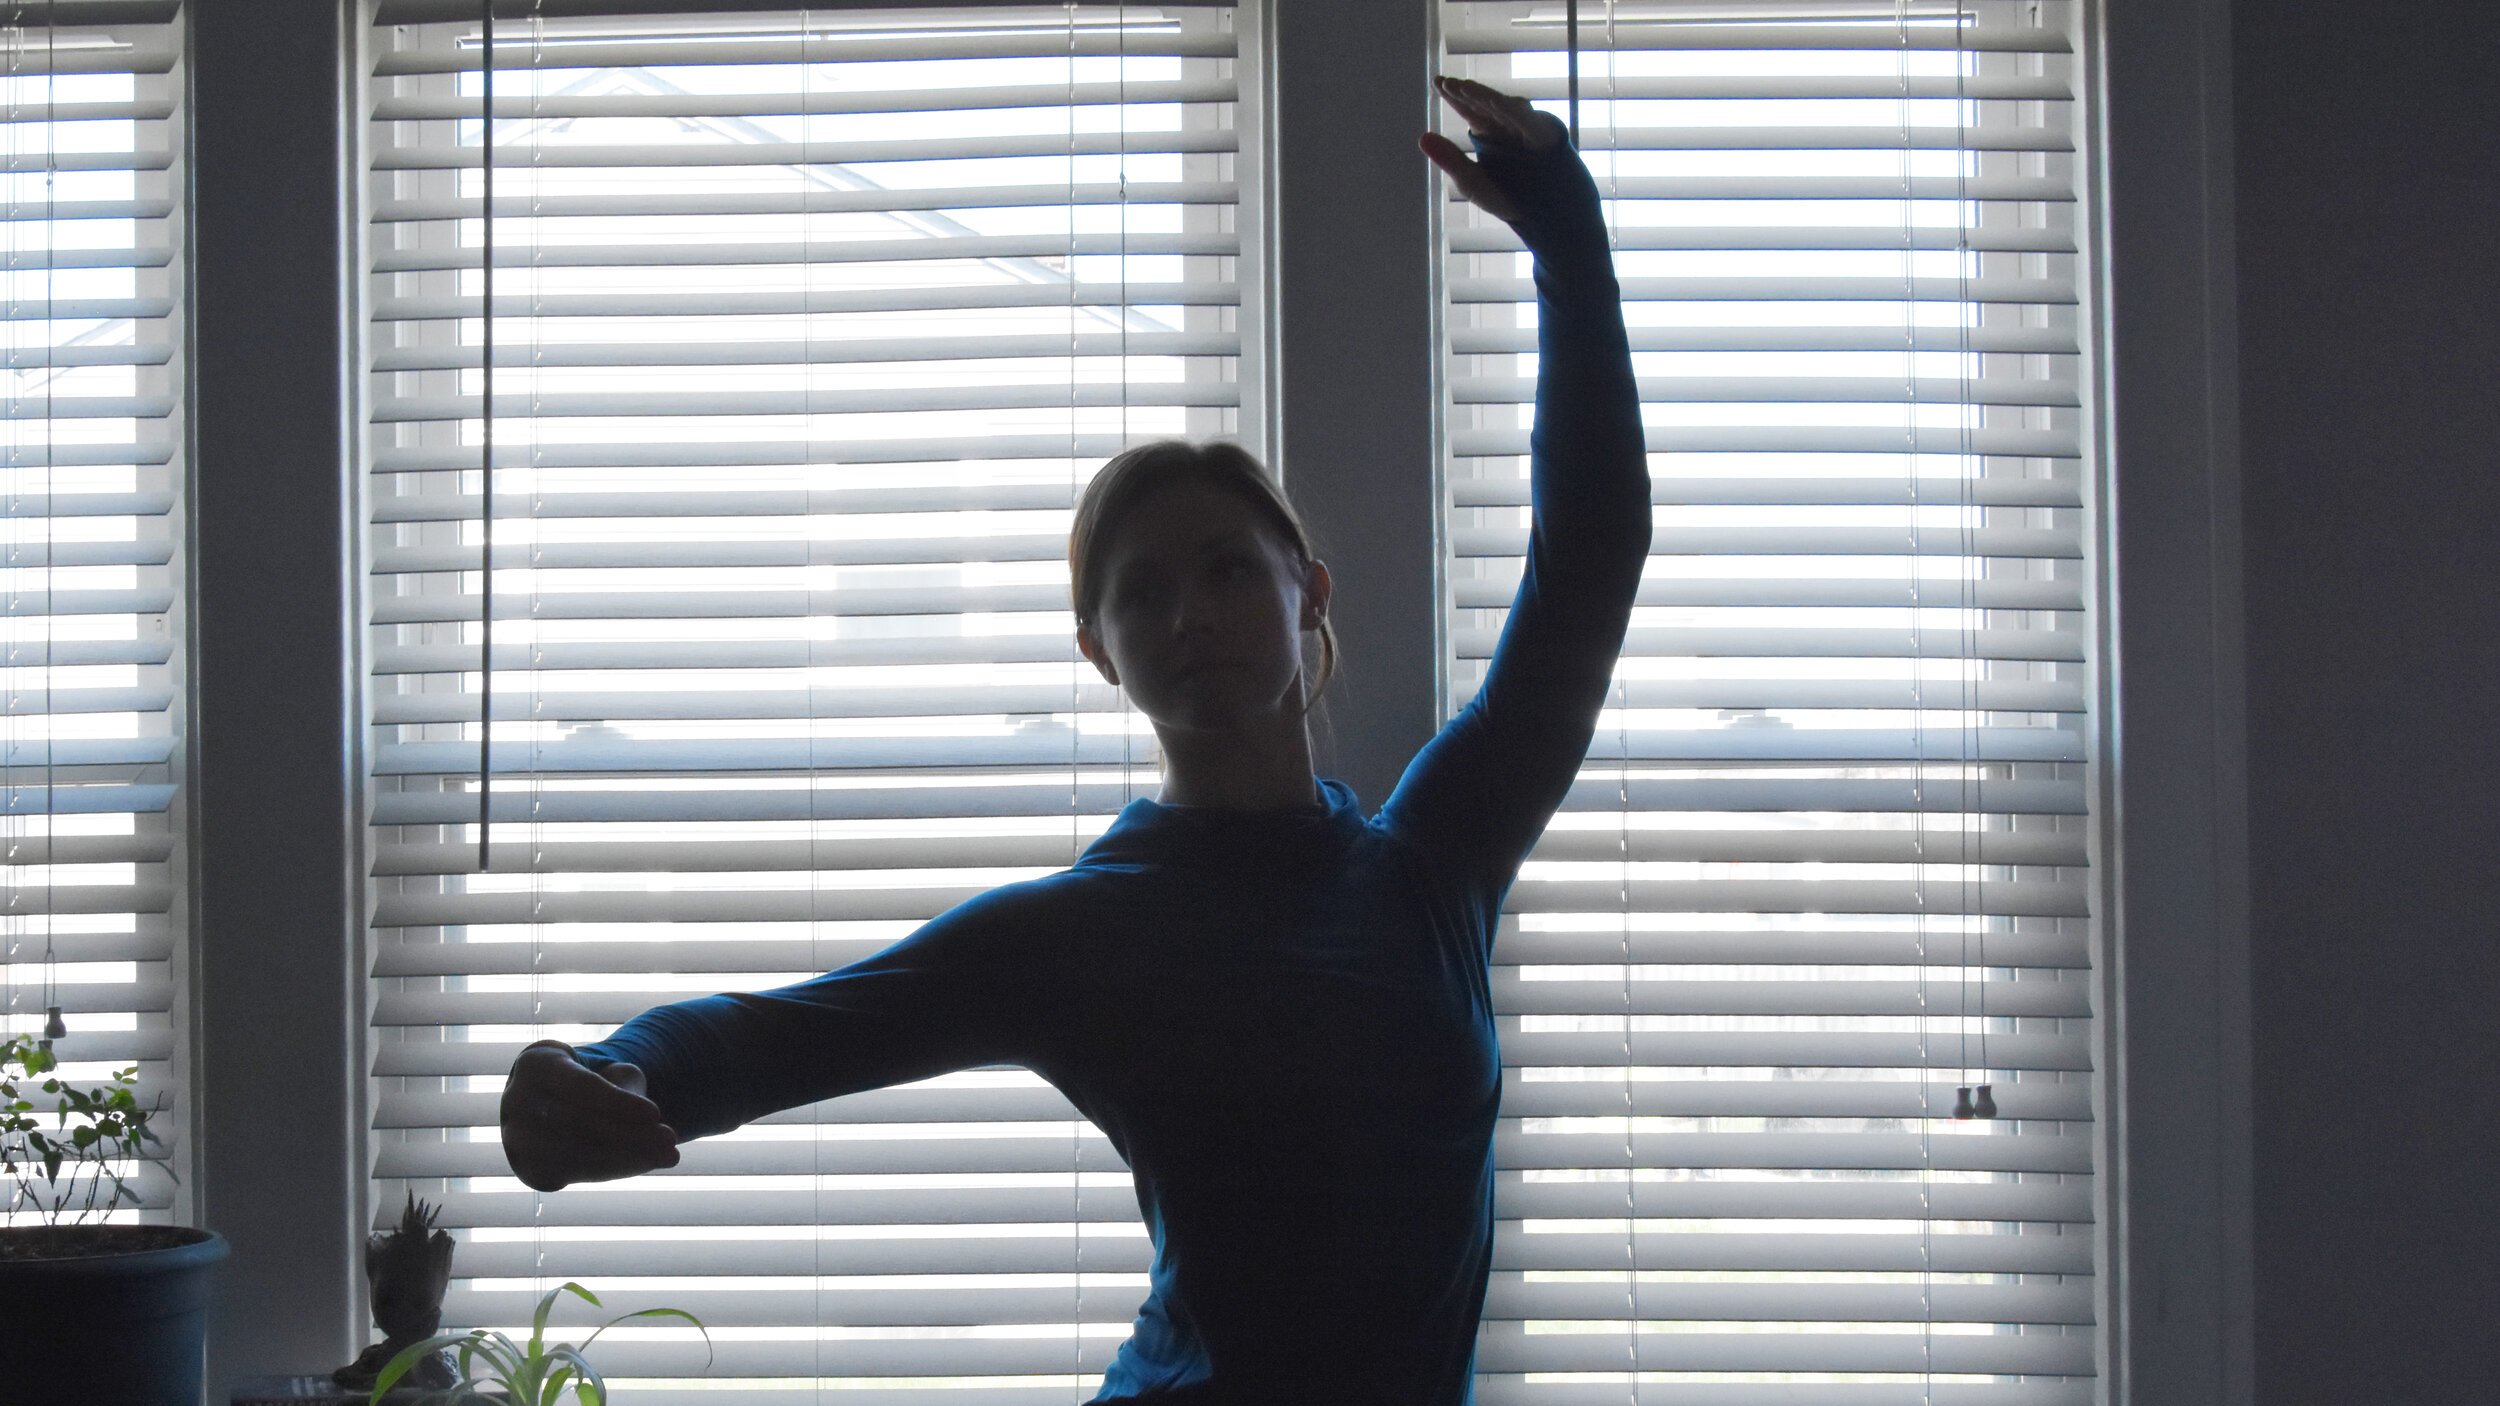
❌Backlit: A bright window behind the subject causes the camera to render the subject as a silhouette.
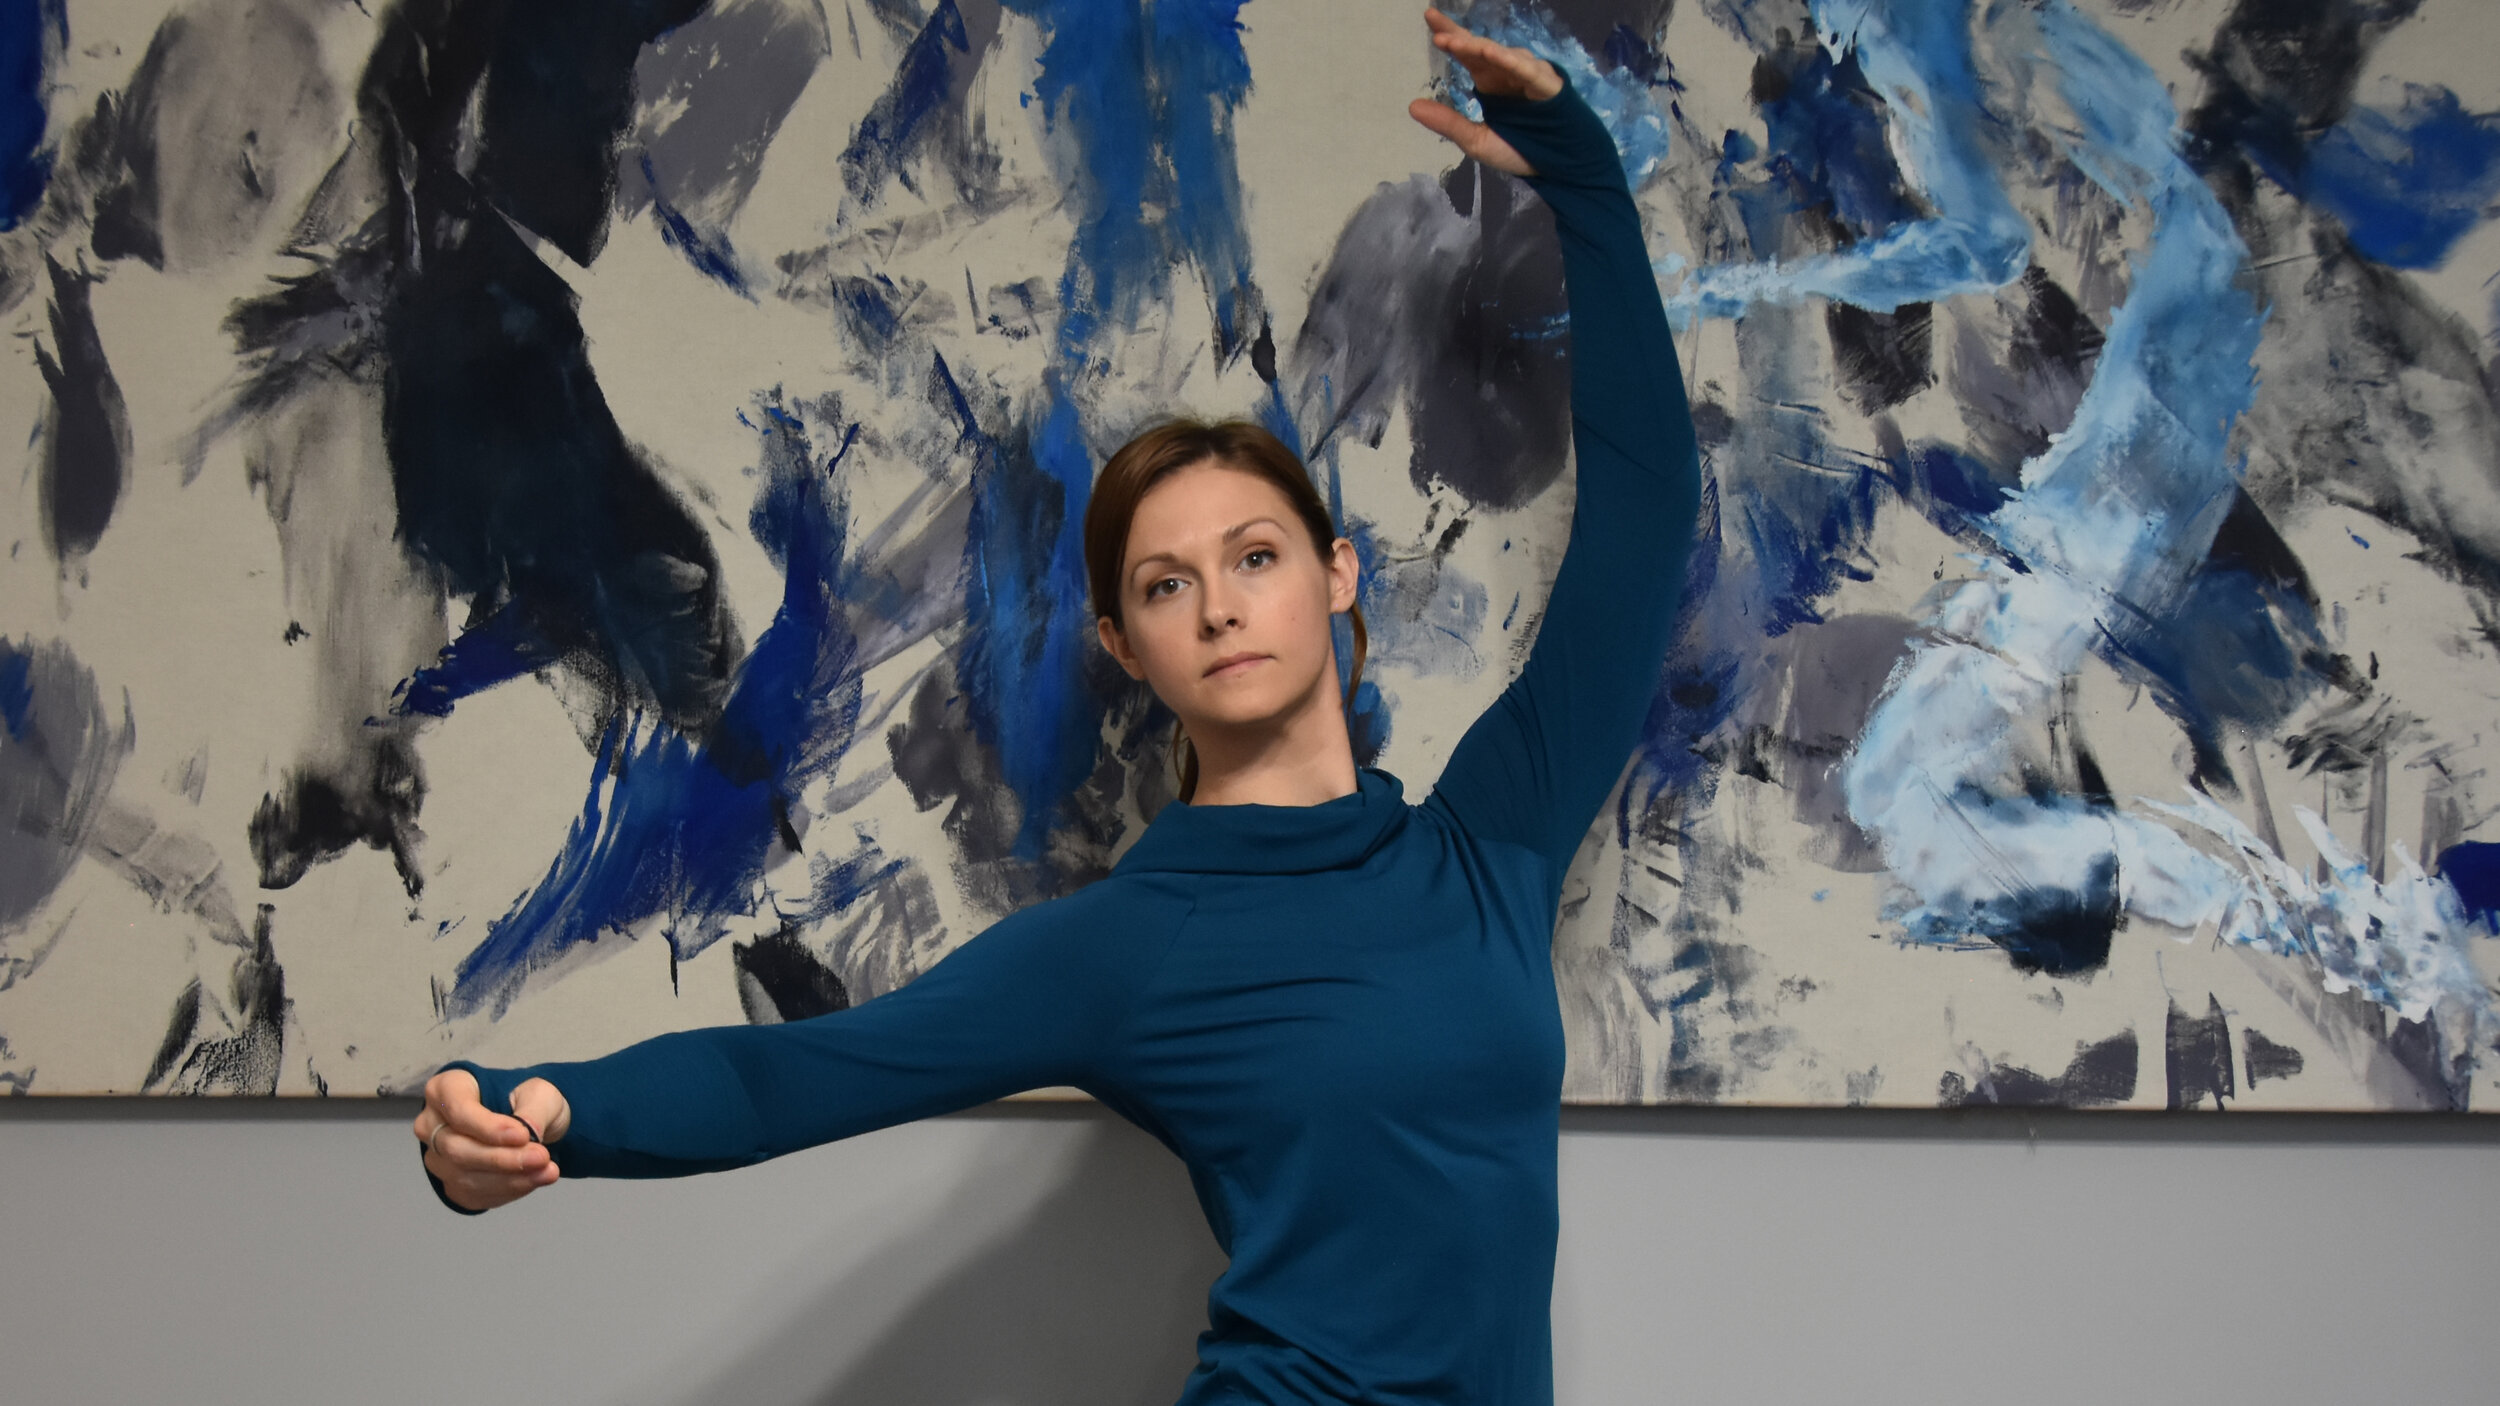
✔️Overhead lighting: Existing room lighting may be sufficient, but check for shadows that obscure the face, hands, or materials.

Overhead and lamps: Watch for shadows that may be cast on important areas. Some light bulbs and lamp shades will cast warm or cool tones.

❌Smartphone LEDs: The phone’s built-in light is useful only at close range and may produce harsh, uneven illumination. Maybe save these for a revival of The Blair Witch Project.
Optimal lighting for general video documentation
If the primary purpose of your recording is to show instruction, movement, or another action clearly, prioritize sufficient, even lighting over dramatic lighting. Ideally, important details should remain visible in both the subject and the surrounding space, without extremely bright highlights or deep shadows.
You may not have much control over the windows, fixtures, or available lighting in a space. However, you will often have some control over the relationship among the light source, subject, and camera. Turning the subject, moving the camera, or shifting the filming area by only a few feet can significantly improve the image. In general, place the brightest light in front of the subject or slightly to one side, rather than directly behind them.
Before recording, look at the image on your phone, not just the room itself. Make sure you can clearly see the subject’s face, hands, body, materials, and any other details important to the instruction.
Backlighting
Backlighting occurs when a bright light source, such as a window, lamp, or open doorway, is positioned behind the subject and faces toward the camera. The phone may adjust its exposure for the bright background, causing the subject to appear dark or silhouetted.
Backlighting can be an intentional artistic choice, but it is generally not useful for straightforward documentation. When possible, turn the setup around so that the light falls on the subject from the front or side. When the light source cannot be moved, try repositioning the subject or camera instead.
Build-in smartphone lights
The small LED light built into a smartphone has a limited range and usually produces concentrated, uneven light. At close distances it may help reveal a face or small object, but it can also create bright highlights, strong shadows, glare, and reflections.
Use the phone’s light only when no better light source is available. A nearby lamp, window, or portable LED light will usually provide broader and more natural-looking illumination.
Finding and using available light
Indoors, windows: Windows can provide an excellent source of light. Position the subject so that they face toward the window or are turned slightly to one side of it. Place the camera near the window, facing into the room, so that the window light falls onto the subject rather than directly into the lens.
Indoors: overhead lights and lamps: Overhead lighting may provide enough general light for documentation, but it can also cast shadows beneath the eyes, chin, hands, or objects being demonstrated. When needed, place one or two table lamps or medium-height floor lamps in front of the subject or slightly to either side. This can help fill in shadows created by overhead fixtures. Whenever possible, use lamps with similar bulb colors so that one part of the image does not appear unusually orange, blue, or green.
Keep lamps stable and out of pathways. Do not cover hot lamps with fabric or improvised diffusion materials.
Outdoors: bright sunlight: Direct sunlight provides plenty of illumination but often creates harsh shadows, glare, and squinting. Whenever possible, move into open shade, such as beneath an awning or beside a building, where the subject is protected from direct sunlight but still faces a bright, open area. Avoid patchy shade beneath trees, which may produce distracting spots of bright light and shadow.
When no shade is available, position the sun behind the camera and slightly to one side rather than directly in the subject’s eyes. Check the phone screen to make sure the subject’s face and body remain clearly visible.
Outdoors: overcast daylight: An overcast sky often produces soft, relatively even light with fewer harsh shadows. This can be especially helpful when documenting movement or several people across a large area. The amount of light can still vary considerably depending on the weather and time of day, so check the image before recording and make sure important details are not becoming dark or indistinct.
Outdoors or indoors at night: Current smartphones may include low-light processing, automatic frame-rate adjustments, or specialized features intended to improve video recorded in dark conditions. These features have improved substantially, but they cannot fully compensate for inadequate light, particularly when the subject is moving. Low-light footage may still show softness, motion blur, noise, or reduced detail.
For clear nighttime documentation, add a broad, steady light source whenever possible. Portable LED work lights, and some exterior security lights may be useful. Position the light in front of the subject or slightly to one side.
Record a short test and play it back before beginning the full activity. A scene that appears visible to your eyes may still be too dark for the camera to record clearly.

Examples of floodlights for shooting outdoors at night. The more light, the better. Use broad, steady light that reveals the subject without creating glare or shining directly into participants’ eyes.
Exposure and Focus

✔️Most smartphones can automatically produce video that is properly focused and exposed. Before recording, tap your subject on the screen to tell the camera what should receive priority.

✔️Some phones and camera applications offer advanced or “Pro” controls. The settings and interface will vary by device and application.
Automatic focus and exposure
Smartphone cameras automatically adjust focus, exposure, and color as you record. For general documentation, these automatic features will produce the most reliable results and require little intervention.
Before recording, tap your subject—or the most important area of the image—on the phone’s screen. On many phones, this tells the camera where to prioritize focus and exposure. Check that faces, hands, materials, and other important details appear clear and properly lit before beginning.
Automatic settings may continue to adjust throughout the recording as the subject moves or the lighting changes. To help the camera maintain a consistent image:
Provide bright, even lighting whenever possible.
Avoid placing a bright window or light directly behind the subject.
Keep objects and people from passing very close to the camera.
Record and review a short test clip before documenting the full activity.
If the subject remains too bright or too dark after you tap the screen, your phone may display a brightness or exposure control that you can slide up or down.
Manual and professional controls
Some phones and camera applications provide advanced controls for focus, exposure, shutter speed, ISO, white balance, and other settings. The controls available, and whether they work for both photos and video, vary by phone model and application. Samsung, for example, includes several manual video controls in Pro Video on supported devices, while Apple provides additional manual video controls through Final Cut Camera.
Manual controls are optional and are not necessary for most classroom documentation. They can provide greater consistency in carefully controlled conditions, but they can also produce footage that is too dark, too bright, or out of focus if the subject or lighting changes. Unless you are already comfortable using them, begin with your phone’s automatic settings.
Third-party camera applications may offer additional controls, but compatibility varies across devices. Test any unfamiliar application before using it to document an important activity.

Check the controls available in your phone’s built-in camera application before downloading another app.
Audio Recording
Good audio depends primarily on distance, the recording environment, and choosing the right microphone for what you need to hear.

Smartphone microphone locations vary by model, and many phones use several microphones. Keep all microphone openings clear of fingers, cases, and mounts.

✔️An external microphone may improve speech recording when the camera must remain far from the speaker. Choose a model that is compatible with your phone and recording application.

✔️ A phone-mounted directional microphone can emphasize nearby sound in front of the camera, but it cannot fully compensate for a large distance between the camera and speaker.

A lavalier or wireless wearable microphone keeps the microphone close to one speaker and allows greater freedom of movement. It may not capture other participants equally well.
Clear, intelligible audio is essential to useful video documentation. Modern smartphones can record acceptable—and sometimes very good—audio under favorable conditions. However, built-in microphones remain strongly affected by the distance between the phone and the speaker, background noise, room echo, wind, and other competing sounds.
Before filming, decide which sounds are most important to your documentation. Do you primarily need to hear an instructor speaking, participant responses, music, movement sounds, or the general activity of the room? A setup that clearly captures one person’s voice may not capture an entire class equally well.
Make a test recording
Before beginning the full activity, record a short test from the position where the phone will actually be placed. Include normal speaking, movement, and any music or environmental sound that will be present. Play the test back to check that the important voices are understandable, that the sound is not distorted, and that the intended microphone is actually being used. Monitoring or reviewing a test is especially important when connecting an external microphone, because otherwise you may not discover a connection or volume problem until after the recording is complete.
Keep the microphones unobstructed
Smartphones may contain several microphones located along different edges or surfaces of the device. Their locations vary by phone model, so do not assume that the only microphone is on the bottom. Make sure that your fingers, phone case, tripod mount, clothing, or other materials are not covering any microphone openings. You do not need to remove the case automatically; make a test recording first and remove or adjust it only if it appears to interfere with the sound.
Reduce the distance to the subject
Place the phone as close to the subject as the required framing and activity will safely allow. The farther the phone is from the speaker, the more prominently it will capture room echo and competing sounds.
For full-body movement documentation, the camera may need to be several feet away. In that situation, prioritize a clear view of the action rather than trying to point a particular edge of the phone toward the speaker. If spoken instruction is essential and the phone must remain far away, an external microphone placed closer to the speaker may be the better solution.
Reduce competing noise
Pause and listen to the room before recording. Common sources of unwanted sound include:
Conversations outside the filming area
Televisions, music, or phones
Fans, air conditioners, projectors, and appliances
Traffic or activity in nearby rooms
Wind when filming outdoors
Reduce or move away from these sounds whenever reasonably possible. Close doors or windows, silence unnecessary devices, or reposition the phone farther from a noisy fixture. You may not control every sound in a classroom, but even a small change in position can improve the recording.
Using an external microphone
An external microphone is optional, but it can make all the difference when clear speech is a high priority or when the camera must remain far from the speaker. Choose the type of microphone according to what you need to capture:
A lavalier or wireless wearable microphone is useful for one instructor who will move around. It prioritizes that person’s voice but may not clearly capture students elsewhere in the room.
A small directional microphone mounted near the phone can emphasize sound in front of the camera and reduce some surrounding noise. It will not, however, make a distant voice sound as though it were recorded nearby.
A microphone placed centrally in the room may work better for discussions involving several people, but it will also capture more room noise.
External smartphone microphones are available in wired and wireless configurations, including models that connect through USB-C, Lightning, or an appropriate audio interface.
Check compatibility before purchasing
Do not assume that every microphone or adapter will work with every phone. Confirm that the microphone is compatible with:
Your specific phone and connector
Your phone’s operating system
The camera application you plan to use
The type of recording you need to make
Many current phones connect to microphones through USB-C; iPhone 15 and later models also use USB-C. Older iPhones use Lightning, while some older phones may use a 3.5 mm audio jack. A microphone with a 3.5 mm plug may require a compatible interface or the correct TRS-to-TRRS adapter—not merely a basic headphone adapter. Be sure to check your device against the specific microphone model, not just the brand names.
Some phones or applications also require you to select the external microphone as the audio source. Supported Samsung Galaxy models, for example, may offer front, rear, omnidirectional, USB, and Bluetooth microphone options within Pro Video mode.
Always make a test recording after connecting an external microphone.
Recording audio separately
A separate audio recorder can provide greater control or place the microphone closer to the speaker, but the audio must later be synchronized with the video in editing software. This is an advanced option and is generally unnecessary for basic classroom documentation.
Managing your filming site and working with participants

❌ Most spaces were not designed as video studios. Scan the complete environment for hazards, distractions, identifying information, and people who may unintentionally enter the frame.

✔️ Use a release form approved for your organization and project. A generic form should be carefully reviewed and adapted before use, particularly when recording minors or working in schools.
Selecting or preparing the site
Before recording, scan the environment. Address safety concerns first. Look for cords, bags, unstable furniture, slippery surfaces, low-hanging objects, and anything else that could interfere with participants or camera operators. Position tripods and other equipment outside normal pathways, and do not block doors, exits, or accessible routes.
Next, look for visual distractions and private or identifying information. Whenever possible, remove or reframe items such as participant names, schedules, computer screens, personal photographs, documents, and unrelated activity. Consider who might unexpectedly enter the frame and whether you can establish a clearly marked filming area or camera-free route.
Permission and participant choice
Before recording, confirm that filming is permitted by the school, organization, venue, or property owner. You should also obtain informed permission from anyone who will be identifiable in the recording.
Explain clearly:
What will be recorded and why
Who will be able to view the recording
Where it will be stored, presented, or published
Whether it may be edited or combined with other material
How long it may be retained or used
Agreeing to participate in a class or activity should not automatically be treated as agreement to appear on camera. Whenever possible, provide a practical way for someone to decline filming without losing access to the activity. This might include establishing a camera-free area, changing the camera angle, avoiding close-ups, or positioning the participant outside the frame.
When working with minors, follow the host organization’s requirements for parent or guardian authorization. It is also good practice to explain the recording to the young person in age-appropriate language and respect their unwillingness to participate, even when an adult has signed a form.
In a school setting, photographs or videos may qualify as education records under FERPA when they are directly related to a student and maintained by the school or by someone acting on its behalf. Teaching artists should therefore follow the host institution’s policies for recording, storing, accessing, and sharing student footage.
Releases and future use
Permission to record is not necessarily permission to publish, promote, archive, or reuse the footage for another purpose. For public-facing, promotional, archival, or other extended uses, obtain written authorization that clearly describes the intended uses of the recording.
Use a release form approved by the school, organization, funder, or project administrator whenever one is available. Avoid relying on generic boilerplate downloaded from the internet unless it has been reviewed and adapted for your particular project and jurisdiction.
Participant review can be a valuable ethical practice, particularly when a recording contains personal stories or sensitive material. However, do not promise final approval, revisions, or removal rights unless your project can reliably honor those commitments.
A note about recording in public and shared spaces
Do not assume that recording is unrestricted simply because a location is open to the public. Photographing or filming things plainly visible from a public place is often legally protected, but audio-recording laws differ by state, and additional restrictions may arise from property rules, privacy expectations, institutional policies, or the intended use of the footage. Because video generally captures sound as well as images, visual and audio-recording requirements should both be considered.
Do not record in restrooms, locker rooms, changing areas, clinical spaces, or other locations where people have a strong expectation of privacy. Follow posted restrictions and instructions from the organization responsible for the property. When requirements are uncertain, obtain permission and consult the host organization or appropriate legal guidance before recording.